Usando Linux para muchas cosas y disfrutando de videojuegos, en dispositivos moviles, consolas y pc. Using Linux for many things and enjoying video games, mobile devices, consoles and pc

Como instalar LAMP en Linux Ubuntu server paso a paso

DriveMeca instalando LAMP en Linux Ubuntu LTS
Una de las formas mas comunes en que usamos nuestros servidores Linux es sirviendo paginas web como por ejemplo instalando algún CMS como WordPress, Joomla, Drupal entre otros. Esta configuracion es conocida como LAMP y viene de las iniciales Linux-Apache-MySQL/MariaDB-PHP.

Para este articulo veremos como instalar y configurar un servidor Linux Ubuntu 16.04 LTS en modo LAMP (en vez de MySQL usaremos MariaDB) paso a paso de la forma mas sencilla y rápida.

Debo aclarar que LAMP no solo se ve en Linux Ubuntu, en todas las distribuciones Linux podemos instalar y configurar gracias a la "magia" del opensource con relativamente pocos cambios. Comencemos entonces con otro articulo de Ubuntu en español

Requerimientos para instalar LAMP en Linux Ubuntu

Como instalar LAMP en Linux Ubuntu server paso a paso

Instalamos dependencias

-Abrimos una consola e instalamos apache, mariadb y php en su versión 7
sudo apt install apache2 mariadb-server php7.0-mysql php7.0-curl php7.0-json php7.0-cgi php7.0 libapache2-mod-php7.0

Vídeo tutorial instalando y configurando LAMP en Ubuntu Server


Activamos Apache 2 en Linux Ubuntu Server

-Activamos el servicio para que ejecute cada vez que haga boot el servidor Linux y ejecutamos apache 2
sudo systemctl enable apache2
sudo systemctl start apache2

-Verificamos este ejecutándose el servicio de Apache 2
sudo systemctl status apache2
apache2.service - LSB: Apache2 web server
   Loaded: loaded (/etc/init.d/apache2; bad; vendor preset: enabled)
  Drop-In: /lib/systemd/system/apache2.service.d
           └─apache2-systemd.conf
   Active: active (running) since dom 2016-05-01 17:22:24 COT; 24min ago
     Docs: man:systemd-sysv-generator(8)
   CGroup: /system.slice/apache2.service
           ├─11573 /usr/sbin/apache2 -k start
           ├─11576 /usr/sbin/apache2 -k start
           ├─11577 /usr/sbin/apache2 -k start
           ├─11578 /usr/sbin/apache2 -k start
           ├─11579 /usr/sbin/apache2 -k start
           └─11580 /usr/sbin/apache2 -k start

may 01 17:22:23 xe systemd[1]: Stopped LSB: Apache2 web server.
may 01 17:22:23 xe systemd[1]: Starting LSB: Apache2 web server...
may 01 17:22:23 xe apache2[11555]:  * Starting Apache httpd web server apache2
may 01 17:22:24 xe apache2[11555]:  *
may 01 17:22:24 xe systemd[1]: Started LSB: Apache2 web server.
may 01 17:46:52 xe systemd[1]: Started LSB: Apache2 web server.

-Abrimos un browser en otro pc dentro de nuestra LAN y navegamos a la ip del servidor Linux
Navegamos a la ip de nuestro Ubuntu LAMP verificando apache

Ya tenemos activo nuestro Apache2

Articulo recomendado: Como instalar interfaz grafica en Ubuntu server paso a paso

Activamos MariaDB en Linux Ubuntu Server

-En estos momentos en Linux Ubuntu al instalar MariaDB no se pide la contraseña  de la cuenta root, por ello la borraremos directamente en la db para poder cambiarla despues
sudo mysql -u root
use mysql;
update user set plugin='' where User='root';
flush privileges;
quit;

-Aseguramos nuestra instalación de MariaDB colocándole contraseña a la cuenta root de MariaDB. Solo escribimos la contraseña y las demás preguntas las dejamos con el default presionando Enter
sudo mysql_secure_installation

NOTE: RUNNING ALL PARTS OF THIS SCRIPT IS RECOMMENDED FOR ALL MariaDB
      SERVERS IN PRODUCTION USE!  PLEASE READ EACH STEP CAREFULLY!

In order to log into MariaDB to secure it, we'll need the current
password for the root user.  If you've just installed MariaDB, and
you haven't set the root password yet, the password will be blank,
so you should just press enter here.

Enter current password for root (enter for none):
OK, successfully used password, moving on...

Setting the root password ensures that nobody can log into the MariaDB
root user without the proper authorisation.

Set root password? [Y/n]
New password: <---escribimos contraseña a la cuenta root de MariaDB
Re-enter new password: <---confirmamos contraseña a la cuenta root de MariaDB
Password updated successfully!
Reloading privilege tables..
 ... Success!


By default, a MariaDB installation has an anonymous user, allowing anyone
to log into MariaDB without having to have a user account created for
them.  This is intended only for testing, and to make the installation
go a bit smoother.  You should remove them before moving into a
production environment.

Remove anonymous users? [Y/n]
 ... Success!

Normally, root should only be allowed to connect from 'localhost'.  This
ensures that someone cannot guess at the root password from the network.

Disallow root login remotely? [Y/n]
 ... Success!

By default, MariaDB comes with a database named 'test' that anyone can
access.  This is also intended only for testing, and should be removed
before moving into a production environment.

Remove test database and access to it? [Y/n]
 - Dropping test database...
ERROR 1008 (HY000) at line 1: Can't drop database 'test'; database doesn't exist
 ... Failed!  Not critical, keep moving...
 - Removing privileges on test database...
 ... Success!

Reloading the privilege tables will ensure that all changes made so far
will take effect immediately.

Reload privilege tables now? [Y/n]
 ... Success!

Cleaning up...

All done!  If you've completed all of the above steps, your MariaDB
installation should now be secure.

Thanks for using MariaDB!

-Activamos el servicio de MariaDB y verificamos que este ejecutándose
sudo systemctl enable mysql
sudo systemctl status mysql
mysql.service - LSB: Start and stop the mysql database server daemon
   Loaded: loaded (/etc/init.d/mysql; bad; vendor preset: enabled)
   Active: active (running) since dom 2016-05-01 17:21:45 COT; 2h 17min ago
     Docs: man:systemd-sysv-generator(8)
    Tasks: 27 (limit: 512)
   Memory: 83.5M
      CPU: 6.150s
   CGroup: /system.slice/mysql.service
           ├─4272 /bin/bash /usr/bin/mysqld_safe
           ├─4273 logger -p daemon err -t /etc/init.d/mysql -i
           ├─4417 /usr/sbin/mysqld --basedir=/usr --datadir=/var/lib/mysql --plugin-dir=/usr/lib/mysql/plugin --user=mysql --skip-log-error --pid-file
           └─4418 logger -t mysqld -p daemon error

may 01 17:22:21 xe /etc/mysql/debian-start[4469]: mysql.func                                         OK
may 01 17:22:21 xe /etc/mysql/debian-start[4469]: mysql.gtid_slave_pos                               OK
may 01 17:22:21 xe /etc/mysql/debian-start[4469]: mysql.help_category                                OK
may 01 17:22:21 xe /etc/mysql/debian-start[4469]: mysql.help_keyword                                 OK
may 01 17:22:21 xe /etc/mysql/debian-start[4469]: mysql.help_relation                                OK
may 01 17:22:21 xe /etc/mysql/debian-start[4469]: mysql.help_topic                                   OK
may 01 17:22:21 xe /etc/mysql/debian-start[4469]: mysql.host                                         OK
may 01 17:22:21 xe /etc/mysql/debian-start[4469]: mysql.index_stats                                  OK
may 01 17:22:21 xe /etc/mysql/debian-start[4469]: mysql.innodb_index_stats                           OK
may 01 17:22:21 xe /etc/mysql/debian-start[11440]: Triggering myisam-recover for all MyISAM tables and aria-recover for all Aria tables

Artículos recomendadosComo optimizar MySQL / MariaDB de forma segura
                                           5 pasos para instalar MariaDB en Ubuntu Server

Verificamos PHP y sus módulos instalados en Linux Ubuntu Server


-Verificamos versión de PHP instalada
php -v
PHP 7.0.25-0ubuntu0.16.04.1 (cli) ( NTS )
Copyright (c) 1997-2017 The PHP Group
Zend Engine v3.0.0, Copyright (c) 1998-2017 Zend Technologies
    with Zend OPcache v7.0.25-0ubuntu0.16.04.1, Copyright (c) 1999-2017, by Zend Technologies

-Creamos un archivo php para verificar módulos instalados con PHP
sudo vi /var/www/html/index.php
<?php
phpinfo();
?>

-Reiniciamos el servicio de Apache2
sudo systemctl restart apache2

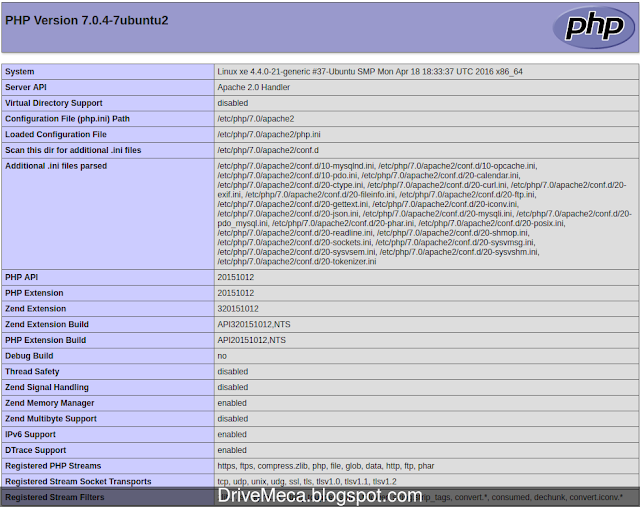
-Abrimos un browser en otro pc en nuestra LAN y navegamos a la ip del servidor Linux Ubuntu LTS http://ip-server/index.php
Verificamos nuestro Ubuntu LAMP


Ya tenemos un servidor Linux Ubuntu LTS con Apache, MariaDB y PHP 7 (comúnmente conocido como LAMP Ubuntu) listo para trabajar con nuestros proyectos web.

Artículos recomendadosComo agregar una cuenta a sudoers en Linux Ubuntu o Debian
                                           Como instalar MySQL Workbench en Linux Ubuntu paso a paso
                                           Como instalar phpMyAdmin paso a paso
                                           Como instalar Webmin en Linux Ubuntu paso a paso

Quiero vivir de mi blog, de enseñar opensource, pero esto no sera posible sin tu apoyo, me ayudas?

Donar 25 USD

Satisfech@ con el articulo? Bien, hazme un favor, compártelo en tus redes sociales (compartir es sexy). Escríbeme en los comentarios aquí debajo y pasa la voz compartiendo el tweet.

Sígueme en twitter google+facebook, email o YouTube  y podrás estar enterado de todas mis publicaciones.
Disfrútenlo.


Share/Bookmark

Como optimizar MySQL / MariaDB de forma segura

Como optimizar MySQL / MariaDB de forma segura

Muchas de las aplicaciones de hoy en día utilizan MySQL o MariaDB como motor de bases de datos para soluciones LAMP. En base a esto se necesita que los query (consultas por medio de SQL) sean lo mas rápido posible para que no tengamos retrasos en la entrega de datos. Nuestro articulo hoy sera sobre como optimizar MySQL / MariaDB de forma segura.

Ademas de tener un buen código, es buena idea tener bien optimizado tu sistema para que todo sea rápido. Buscando en internet encontré este script que nos permite optimizar el motor de bases de datos de una forma bastante sencilla.

Su nombre es MySQLTuner y esta escrito en perl pudiéndose ejecutar en cualquier distribución Linux actual que tenga perl instalado. Para este articulo lo mostrare en un servidor Linux Centos 7 con MariaDB pero esto no significa que no lo puedas ejecutarlo en otra distribución Linux cumpliendo los siguientes requerimientos.

Requerimientos para ejecutar MySQLTuner

  • Linux
  • MariaDB o MySQL
  • Cuenta root del motor de bases de datos
  • Perl

Como optimizar MySQL / MariaDB de forma segura

-Antes de comenzar te recomiendo siempre tener un backup de la configuracion de tu MariaDB o MySQL. Ya sea copiando el /etc/my.cnf a otro carpeta o dejando una copia comentada de las variables modificadas

-Instalamos para nuestro uso
yum install wget less

-El primer paso es verificar que nuestro servidor de bases de datos este ejecutándose. Ejecutamos el siguiente comando

sudo systemctl status mariadb
● mariadb.service - MariaDB database server
   Loaded: loaded (/usr/lib/systemd/system/mariadb.service; enabled; vendor preset: disabled)
   Active: active (running) since Fri 2018-02-16 20:32:43 UTC; 12min ago
 Main PID: 389 (mysqld_safe)
   CGroup: /system.slice/mariadb.service
           ├─389 /bin/sh /usr/bin/mysqld_safe --basedir=/usr
           └─550 /usr/libexec/mysqld --basedir=/usr --datadir=/var/lib/mysql --plugin-dir=/usr/lib64/mysql/pl...

Feb 16 20:32:38 cenwp.drivemeca.com systemd[1]: Starting MariaDB database server...
Feb 16 20:32:38 cenwp.drivemeca.com mariadb-prepare-db-dir[358]: Database MariaDB is probably initialized i...e.
Feb 16 20:32:39 cenwp.drivemeca.com mysqld_safe[389]: 180216 20:32:39 mysqld_safe Logging to '/var/log/mar...g'.
Feb 16 20:32:39 cenwp.drivemeca.com mysqld_safe[389]: 180216 20:32:39 mysqld_safe Starting mysqld daemon w...sql
Feb 16 20:32:43 cenwp.drivemeca.com systemd[1]: Started MariaDB database server.
Hint: Some lines were ellipsized, use -l to show in full.
Verificamos este ejecutandose el servicio en Linux

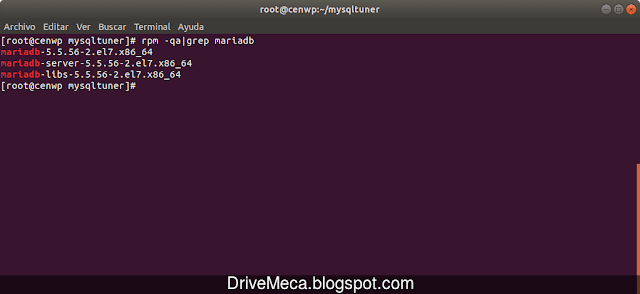
-Para conocer mas sobre MariaDB verificamos que versión tenemos instalada en nuestro Linux Centos
rpm -qa|grep mariadb
mariadb-5.5.56-2.el7.x86_64
mariadb-server-5.5.56-2.el7.x86_64
mariadb-libs-5.5.56-2.el7.x86_64
Conocer que paquetes tienes de MariaDB puede ser ventajoso

-Creamos un directorio para descargar el script y ejecutarlo desde ahi
mkdir mysqltuner
cd mysqltuner

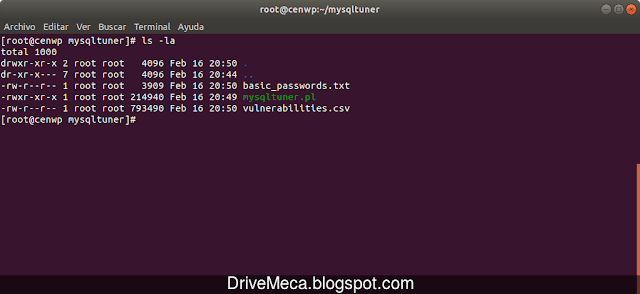
-Descargamos el script MySQLTuner junto a dos archivos mas que nos pueden servir para otras tareas de verificacion
wget http://mysqltuner.pl/ -O mysqltuner.pl
wget https://raw.githubusercontent.com/major/MySQLTuner-perl/master/basic_passwords.txt -O basic_passwords.txt
wget https://raw.githubusercontent.com/major/MySQLTuner-perl/master/vulnerabilities.csv -O vulnerabilities.csv
Con MySQLTuner descargamos 2 archivos mas

-Damos permisos de ejecución al script
chmod +x mysqltuner.pl

-Tienes dudas de como usar el script. Su ayuda te servirá para sacarle el mayor provecho al script
./mysqltuner.pl --help
Name:
     MySQLTuner 1.7.5 - MySQL High Performance Tuning Script

Important Usage Guidelines:
    To run the script with the default options, run the script without
    arguments Allow MySQL server to run for at least 24-48 hours before
    trusting suggestions Some routines may require root level privileges
    (script will provide warnings) You must provide the remote server's
    total memory when connecting to other servers

Connection and Authentification:
     --host <hostname>           Connect to a remote host to perform tests (default: localhost)
     --socket <socket>           Use a different socket for a local connection
     --port <port>               Port to use for connection (default: 3306)
     --user <username>           Username to use for authentication
     --userenv <envvar>          Name of env variable which contains username to use for authentication
     --pass <password>           Password to use for authentication
     --passenv <envvar>          Name of env variable which contains password to use for authentication
     --ssl-ca <path>             Path to public key
     --mysqladmin <path>         Path to a custom mysqladmin executable
     --mysqlcmd <path>           Path to a custom mysql executable
     --defaults-file <path>      Path to a custom .my.cnf

Performance and Reporting Options:
     --skipsize                  Don't enumerate tables and their types/sizes (default: on)
                                 (Recommended for servers with many tables)
     --skippassword              Don't perform checks on user passwords(default: off)
     --checkversion              Check for updates to MySQLTuner (default: don't check)
     --updateversion             Check for updates to MySQLTuner and update when newer version is available (default: don't check)
     --forcemem <size>           Amount of RAM installed in megabytes
     --forceswap <size>          Amount of swap memory configured in megabytes
     --passwordfile <path>       Path to a password file list(one password by line)

Output Options:
     --silent                    Don't output anything on screen
     --nogood                    Remove OK responses
     --nobad                     Remove negative/suggestion responses
     --noinfo                    Remove informational responses
     --debug                     Print debug information
     --dbstat                    Print database information
     --idxstat                   Print index information
     --sysstat                   Print system information
     --pfstat                    Print Performance schema
     --bannedports               Ports banned separated by comma(,)
     --maxportallowed            Number of ports opened allowed on this hosts
     --cvefile <path>            CVE File for vulnerability checks
     --nocolor                   Don't print output in color
     --json                      Print result as JSON string
     --buffers                   Print global and per-thread buffer values
     --outputfile <path>         Path to a output txt file
     --reportfile <path>         Path to a report txt file
     --template   <path>         Path to a template file
     --verbose                   Prints out all options (default: no verbose)

-La forma mas sencilla de ejecutarlo es sin parámetros. De esta forma buscara un MySQL /MariaDB ejecutándose localmente. MySQLTuner nos muestra mucha información ayudado con colores

  • Mensajes en verde: Normal
  • Mensajes en rojo: Corregir o mejorar


Se nos pedirá la cuenta root (o una cuenta con permisos de root) y contraseña de MySQL / MariaDB
./mysqltuner.pl 
 >>  MySQLTuner 1.7.5 - Major Hayden <major@mhtx.net>
 >>  Bug reports, feature requests, and downloads at http://mysqltuner.com/
 >>  Run with '--help' for additional options and output filtering

[--] Skipped version check for MySQLTuner script
Please enter your MySQL administrative login: root
Please enter your MySQL administrative password: [OK] Currently running supported MySQL version 5.5.56-MariaDB
[OK] Operating on 64-bit architecture

-------- Log file Recommendations ------------------------------------------------------------------
[--] Log file: /var/log/mariadb/mariadb.log(3K)
[OK] Log file /var/log/mariadb/mariadb.log exists
[OK] Log file /var/log/mariadb/mariadb.log is readable.
[OK] Log file /var/log/mariadb/mariadb.log is not empty
[OK] Log file /var/log/mariadb/mariadb.log is smaller than 32 Mb
[OK] /var/log/mariadb/mariadb.log doesn't contain any warning.
[OK] /var/log/mariadb/mariadb.log doesn't contain any error.
[--] 2 start(s) detected in /var/log/mariadb/mariadb.log
[--] 1) 180216 20:32:42 [Note] /usr/libexec/mysqld: ready for connections.
[--] 2) 171127 23:14:55 [Note] /usr/libexec/mysqld: ready for connections.
[--] 1 shutdown(s) detected in /var/log/mariadb/mariadb.log
[--] 1) 171127 23:57:34 [Note] /usr/libexec/mysqld: Shutdown complete

-------- Storage Engine Statistics -----------------------------------------------------------------
[--] Status: +ARCHIVE +Aria +BLACKHOLE +CSV +FEDERATED +InnoDB +MEMORY +MRG_MYISAM +MyISAM +PERFORMANCE_SCHEMA 
[--] Data in InnoDB tables: 976K (Tables: 12)
[OK] Total fragmented tables: 0

-------- Security Recommendations ------------------------------------------------------------------
[OK] There are no anonymous accounts for any database users
[OK] All database users have passwords assigned
[--] There are 612 basic passwords in the list.

-------- CVE Security Recommendations --------------------------------------------------------------
[OK] NO SECURITY CVE FOUND FOR YOUR VERSION

-------- Performance Metrics -----------------------------------------------------------------------
[--] Up for: 24m 45s (17 q [0.011 qps], 15 conn, TX: 40K, RX: 1K)
[--] Reads / Writes: 100% / 0%
[--] Binary logging is disabled
[--] Physical Memory     : 512.0M
[--] Max MySQL memory    : 836.0M
[--] Other process memory: 78.2M
[--] Total buffers: 416.0M global + 2.8M per thread (151 max threads)
[--] P_S Max memory usage: 0B
[--] Galera GCache Max memory usage: 0B
[OK] Maximum reached memory usage: 418.8M (81.79% of installed RAM)
[!!] Maximum possible memory usage: 836.0M (163.28% of installed RAM)
[!!] Overall possible memory usage with other process exceeded memory
[OK] Slow queries: 0% (0/17)
[OK] Highest usage of available connections: 0% (1/151)
[!!] Aborted connections: 46.67%  (7/15)
[!!] name resolution is active : a reverse name resolution is made for each new connection and can reduce performance
[!!] Query cache may be disabled by default due to mutex contention.
[!!] Query cache efficiency: 0.0% (0 cached / 7 selects)
[OK] Query cache prunes per day: 0
[OK] No Sort requiring temporary tables
[OK] No joins without indexes
[OK] Temporary tables created on disk: 0% (0 on disk / 4 total)
[!!] Thread cache is disabled
[OK] Table cache hit rate: 100% (26 open / 0 opened)
[OK] Open file limit used: 2% (21/1K)
[OK] Table locks acquired immediately: 100% (36 immediate / 36 locks)

-------- Performance schema ------------------------------------------------------------------------
[--] Performance schema is disabled.
[--] Memory used by P_S: 0B
[--] Sys schema isn't installed.

-------- ThreadPool Metrics ------------------------------------------------------------------------
[--] ThreadPool stat is enabled.
[--] Thread Pool Size: 4 thread(s).
[--] Using default value is good enough for your version (5.5.56-MariaDB)

-------- MyISAM Metrics ----------------------------------------------------------------------------
[!!] Key buffer used: 18.2% (24M used / 134M cache)
[OK] Key buffer size / total MyISAM indexes: 128.0M/99.0K

-------- InnoDB Metrics ----------------------------------------------------------------------------
[--] InnoDB is enabled.
[--] InnoDB Thread Concurrency: 0
[!!] InnoDB File per table is not activated
[OK] InnoDB buffer pool / data size: 128.0M/976.0K
[!!] Ratio InnoDB log file size / InnoDB Buffer pool size (7.8125 %): 5.0M * 2/128.0M should be equal 25%
[OK] InnoDB buffer pool instances: 1
[--] InnoDB Buffer Pool Chunk Size not used or defined in your version
[OK] InnoDB Read buffer efficiency: 91.91% (4531 hits/ 4930 total)
[!!] InnoDB Write Log efficiency: 0% (1 hits/ 0 total)
[OK] InnoDB log waits: 0.00% (0 waits / 1 writes)

-------- AriaDB Metrics ----------------------------------------------------------------------------
[--] AriaDB is enabled.
[OK] Aria pagecache size / total Aria indexes: 128.0M/1B

-------- TokuDB Metrics ----------------------------------------------------------------------------
[--] TokuDB is disabled.

-------- XtraDB Metrics ----------------------------------------------------------------------------
[--] XtraDB is disabled.

-------- RocksDB Metrics ---------------------------------------------------------------------------
[--] RocksDB is disabled.

-------- Spider Metrics ----------------------------------------------------------------------------
[--] Spider is disabled.

-------- Connect Metrics ---------------------------------------------------------------------------
[--] Connect is disabled.

-------- Galera Metrics ----------------------------------------------------------------------------
[--] Galera is disabled.

-------- Replication Metrics -----------------------------------------------------------------------
[--] Galera Synchronous replication: NO
[--] No replication slave(s) for this server.
[--] This is a standalone server.

-------- Recommendations ---------------------------------------------------------------------------
General recommendations:
    MySQL started within last 24 hours - recommendations may be inaccurate
    Reduce your overall MySQL memory footprint for system stability
    Dedicate this server to your database for highest performance.
    Enable the slow query log to troubleshoot bad queries
    Reduce or eliminate unclosed connections and network issues
    Configure your accounts with ip or subnets only, then update your configuration with skip-name-resolve=1
    Set thread_cache_size to 4 as a starting value
    Consider installing Sys schema from https://github.com/mysql/mysql-sys
    Read this before changing innodb_log_file_size and/or innodb_log_files_in_group: http://bit.ly/2wgkDvS
Variables to adjust:
  *** MySQL's maximum memory usage is dangerously high ***
  *** Add RAM before increasing MySQL buffer variables ***
    query_cache_size (=0)
    query_cache_type (=0)
    query_cache_limit (> 1M, or use smaller result sets)
    thread_cache_size (start at 4)
    innodb_file_per_table=ON

    innodb_log_file_size should be (=16M) if possible, so InnoDB total log files size equals to 25% of buffer pool size.

-Despues de ejecutar MySQLTuner veremos al final una serie de recomendaciones para agregar a nuestro motor de bases de datos. Editamos y agregamos
vi /etc/my.cnf
[mysqld]
datadir=/var/lib/mysql
socket=/var/lib/mysql/mysql.sock
symbolic-links=0
query_cache_size=0
query_cache_type=0
query_cache_limit=1M
thread_cache_size=4

[mysqld_safe]
log-error=/var/log/mariadb/mariadb.log
pid-file=/var/run/mariadb/mariadb.pid

!includedir /etc/my.cnf.d

-Reiniciamos el servicio y verificamos quede ejecutándose correctamente con los cambios en su configuracion
systemctl restart mariadb
systemctl status mariadb


-Tienes dudas de como mas ejecutar el script? Su ayuda te servira
./mysqltuner.pl --help
Name:
     MySQLTuner 1.7.5 - MySQL High Performance Tuning Script

Important Usage Guidelines:
    To run the script with the default options, run the script without
    arguments Allow MySQL server to run for at least 24-48 hours before
    trusting suggestions Some routines may require root level privileges
    (script will provide warnings) You must provide the remote server's
    total memory when connecting to other servers

Connection and Authentification:
     --host <hostname>           Connect to a remote host to perform tests (default: localhost)
     --socket <socket>           Use a different socket for a local connection
     --port <port>               Port to use for connection (default: 3306)
     --user <username>           Username to use for authentication
     --userenv <envvar>          Name of env variable which contains username to use for authentication
     --pass <password>           Password to use for authentication
     --passenv <envvar>          Name of env variable which contains password to use for authentication
     --ssl-ca <path>             Path to public key
     --mysqladmin <path>         Path to a custom mysqladmin executable
     --mysqlcmd <path>           Path to a custom mysql executable
     --defaults-file <path>      Path to a custom .my.cnf

Performance and Reporting Options:
     --skipsize                  Don't enumerate tables and their types/sizes (default: on)
                                 (Recommended for servers with many tables)
     --skippassword              Don't perform checks on user passwords(default: off)
     --checkversion              Check for updates to MySQLTuner (default: don't check)
     --updateversion             Check for updates to MySQLTuner and update when newer version is available (default: don't check)
     --forcemem <size>           Amount of RAM installed in megabytes
     --forceswap <size>          Amount of swap memory configured in megabytes
     --passwordfile <path>       Path to a password file list(one password by line)

Output Options:
     --silent                    Don't output anything on screen
     --nogood                    Remove OK responses
     --nobad                     Remove negative/suggestion responses
     --noinfo                    Remove informational responses
     --debug                     Print debug information
     --dbstat                    Print database information
     --idxstat                   Print index information
     --sysstat                   Print system information
     --pfstat                    Print Performance schema
     --bannedports               Ports banned separated by comma(,)
     --maxportallowed            Number of ports opened allowed on this hosts
     --cvefile <path>            CVE File for vulnerability checks
     --nocolor                   Don't print output in color
     --json                      Print result as JSON string
     --buffers                   Print global and per-thread buffer values
     --outputfile <path>         Path to a output txt file
     --reportfile <path>         Path to a report txt file
     --template   <path>         Path to a template file

     --verbose                   Prints out all options (default: no verbose)

MySQLTuner no reemplaza a un DBA pero te servirá para hacer unos cambios simples en la configuracion de MySQL / MariaDB mejorando su rendimiento

Artículos recomendados:Acelera con nginx tu servidor Ubuntu LEMP
                       Como instalar Adminer en Linux Centos paso a paso
                       Como cambiar la contraseña de root en MySQL
                       15 minutos para configurar un Linux Centos 7 LAMP
                       Como instalar phpMyAdmin paso a paso
                       Como instalar MySQL Workbench en Linux Ubuntu paso a paso


Quiero vivir de mi blog, de enseñar opensource, pero esto no sera posible sin tu apoyo, me ayudas?


Satisfech@ con el articulo? Bien, hazme un favor, compártelo en tus redes sociales (compartir es sexy). Escríbeme en los comentarios aquí debajo y pasa la voz compartiendo el tweet.
Sígueme en twitter google+facebook, email o YouTube  y podrás estar enterado de todas mis publicaciones.
Disfrútenlo.


Share/Bookmark

5 pasos para instalar MariaDB en Ubuntu Server

5 pasos para instalar MariaDB en Ubuntu Server


Muchos dirán que este articulo sobra. Si, MariaDB esta en los repositorios de Ubuntu pero no en su ultima versión stable.

Porque usar una versión moderna de MariaDB

Tener una ultima versión stable de MariaDB te permitirá tener acceso a nuevas funcionalidades, correcciones de errores (bugs) y por supuesto, mejor optimizacion para mayor velocidad por citar algunas ventajas.

Requisitos para MariaDB en Ubuntu Server

  • Ubuntu Server, preferiblemente LTS, actualizado
  • Conexión a internet


5 pasos para instalar MariaDB en Ubuntu Server

-Para instalar normalmente MariaDB solo tenemos que abrir una consola en Ubuntu Server y ejecutar el siguiente comando. Así tendríamos los paquetes que están en repositorios de Ubuntu, no actualizados a su ultima versión
sudo apt install mariadb-server

Vídeo tutorial en español: Instalando MariaDB desde repositorio oficial


Como instalar versión actualizada de MariaDB en Ubuntu Server

-Instalamos dependencias
sudo apt install software-properties-common

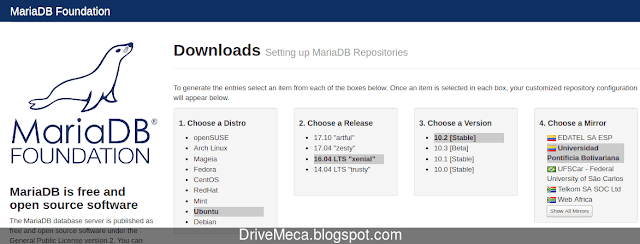
-Abrimos un browser y navegamos al URL oficial de MariaDB. Alli de forma sencilla, solo dando click en los 4 pasos de izquierda a derecha tendremos "creado" la configuracion de repositorio para instalar. En mi caso, para MariaDB en Ubuntu server 16.04 Xenial estos son los pasos:
  1. Ubuntu
  2. 16.04 LTS "xenial"
  3. 10.2 stable
  4. Elijo un mirror (en este caso Universidad Pontificia Bolivariana. En tu caso seguramente este campo sera diferente)

Dependiendo de nuestra seleccion en los 4 pasos, sera la configuracion de MariaDB

-Agregamos a nuestro Ubuntu server la llave publica de MariaDB
sudo apt-key adv --recv-keys --keyserver hkp://keyserver.ubuntu.com:80 0xF1656F24C74CD1D8
Executing: /tmp/tmp.cQISjU9QGt/gpg.1.sh --recv-keys
--keyserver
hkp://keyserver.ubuntu.com:80
0xF1656F24C74CD1D8
gpg: requesting key C74CD1D8 from hkp server keyserver.ubuntu.com
gpg: key C74CD1D8: public key "MariaDB Signing Key <signing-key@mariadb.org>" imported
gpg: Total number processed: 1
gpg:               imported: 1  (RSA: 1)

-Configuramos el repositorio de MariaDB
sudo add-apt-repository 'deb [arch=amd64,i386,ppc64el] http://mirror.upb.edu.co/mariadb/repo/10.2/ubuntu xenial main'

-Verificamos la configuracion de nuestro sources.list. Al final nos debe aparecer el recien agregado repositorio
cat /etc/apt/sources.list
deb http://archive.ubuntu.com/ubuntu xenial main restricted universe multiverse

deb http://archive.ubuntu.com/ubuntu xenial-updates main restricted universe multiverse

deb http://archive.ubuntu.com/ubuntu xenial-security main restricted universe multiverse
deb [arch=i386,ppc64el,amd64] http://mirror.upb.edu.co/mariadb/repo/10.2/ubuntu xenial main
# deb-src [arch=i386,ppc64el,amd64] http://mirror.upb.edu.co/mariadb/repo/10.2/ubuntu xenial main

-Actualizamos nuestra copia local e instalamos MariaDB
sudo apt update
sudo apt install mariadb-server

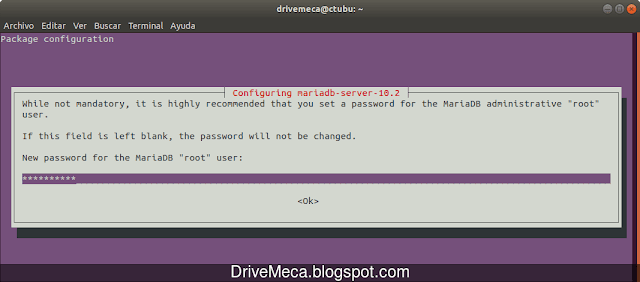
-Apenas se descarga e instala, se nos pedirá colocarle una contraseña a la cuenta root de MariaDB. La escribimos (no se vera en pantalla) y presionamos Enter
La instalacion de MariaDB nos pide activar una contraseña para su cuenta root

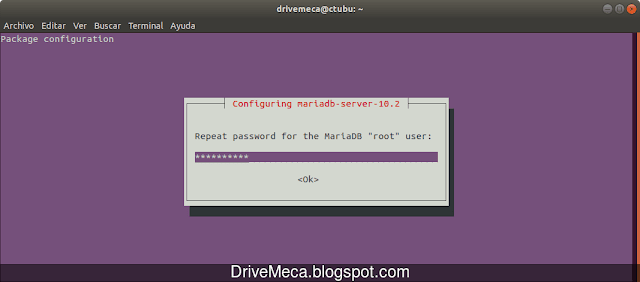
-Confirmamos la contraseña de root MariaDB escribiéndola nuevamente y presionando Enter
Confirmamos la contraseña de root MariaDB

-Activamos el servicio MariaDB para que ejecute cada vez que haga boot Ubuntu Server y verificamos este ejecutándose correctamente
sudo systemctl enable mariadb
sudo systemctl status mariadb
Verificamos MariaDB este en modo active

-Una ultima verificación, ejecutamos los siguientes comandos. Así confirmaremos la cuenta root con su contraseña entre otros datos
mysql -u root -p
Enter password: 
Welcome to the MariaDB monitor.  Commands end with ; or \g.
Your MariaDB connection id is 9
Server version: 10.2.13-MariaDB-10.2.13+maria~xenial-log mariadb.org binary distribution

Copyright (c) 2000, 2018, Oracle, MariaDB Corporation Ab and others.

Type 'help;' or '\h' for help. Type '\c' to clear the current input statement.

MariaDB [(none)]> show databases;
+--------------------+
| Database           |
+--------------------+
| information_schema |
| mysql              |
| performance_schema |
+--------------------+
3 rows in set (0.00 sec)

MariaDB [(none)]> quit;
Bye
MariaDB para Ubuntu Xenial LTS ejecutandose correctamente

Como eliminar MariaDB de Ubuntu Server

-Abrimos una consola y ejecutamos el siguiente comando. Se eliminara MariaDB ademas de sus dependencias ya no necesarias en Ubuntu Server
sudo apt remove --auto-remove mariadb-server

Ya tienes tu servidor Ubuntu con un actualizado MariaDB listo para producción. Lo utilizas o prefieres otro motor de bases de datos?

                                            Como instalar MySQL Workbench en Linux Ubuntu paso a paso
                                            Como administrar MySQL con Webmin
                                            Como instalar Adminer en Linux Centos paso a paso
                                            Como instalar phpMyAdmin paso a paso
                                            Como instalar LAMP en Linux Ubuntu server paso a paso


Quiero vivir de mi blog, de enseñar opensource, pero esto no sera posible sin tu apoyo, me ayudas?


Satisfech@ con el articulo? Bien, hazme un favor, compártelo en tus redes sociales (compartir es sexy). Escríbeme en los comentarios aquí debajo y pasa la voz compartiendo el tweet.
Sígueme en twitter google+facebook, email o YouTube  y podrás estar enterado de todas mis publicaciones.
Disfrútenlo.

Share/Bookmark